Welcome. For your first weeks and the unboxing videos, start with Getting Started. Iris is the voice in the headset — say her name anytime you need a hand.
Important Information
Foreword
Welcome to the user manual for IrisVision Vista — your essential guide to the optimal and safe use of this cutting-edge custom headset. Please note that the information contained in this manual is subject to change without prior notice. To ensure you have the latest version, please visit IrisVision’s website at https://irisvision.com or get in touch with your authorized distributor.
Before delving into the details, it’s important to clarify that this user manual focuses on providing crucial instructions for using the IrisVision Vista headset effectively.
We urge you to carefully read and understand this manual. Store all user manuals in a secure and easily accessible location for future reference. If you have any questions or feedback regarding this manual, please don’t hesitate to contact us for further assistance.
Within this manual, you will find the recommended inspection and preparation procedures to follow before utilizing the IrisVision Vista headset. Additionally, we outline essential precautions to take when disposing of the product after use, ensuring both safety and environmental responsibility.
It is of utmost importance that you adhere to all the instructions provided in this user manual. Failure to do so could lead to severe injuries to the patient, user, or a third party, as well as potential damage to the equipment.
At IrisVision, our mission is to empower individuals with visual impairments, offering them an immersive experience that goes beyond mere visual aid. We are committed to providing technology that enhances independence and enables users to engage confidently with the world.
Thank you for choosing IrisVision Vista. Together, we embark on a journey of enriching lives and redefining possibilities for those facing visual challenges.
Intended Use
IrisVision Vista is a custom headset designed as a visual aid and rehabilitation platform intended to assist individuals with visual impairments in engaging with the world and achieving new levels of independence. The device is not intended to provide explanations or guidance for endoscopic techniques.
The primary intended use of IrisVision Vista is to enhance visual perception and provide magnification to aid users with visual impairments in daily activities, such as reading, recognizing faces, and navigating their surroundings. The device is intended to be used under the guidance and supervision of qualified healthcare professionals or caregivers.
IrisVision Vista is recommended for use in various environments, including but not limited to homes, educational settings, and community spaces. It is intended for use by individuals with visual impairments of different age groups, with appropriate adjustments made to accommodate individual needs.
The device is designed to be used with compatible accessories. Users are advised to follow the recommended inspection and preparation procedures outlined in this user manual before utilizing the headset.
Indications for Use
IrisVision Vista is indicated for use by individuals with visual impairments to enhance their visual perception and achieve improved independence in daily activities. The device serves as a visual aid and rehabilitation platform, offering magnification and image enhancement to support users.
Device Common Names
Wearable Visual Aid, Visual Aid, VR Visual Aid, Assistive Visual Aid.
Description of Vista
Device Description
IrisVision is an assistive device designed for people with low vision, combining virtual reality technology with custom software. It is an effective, low-vision solution available for individuals with Macular Degeneration, Diabetic Retinopathy, Glaucoma, Retinitis Pigmentosa, and other ocular disorders.
Package Contents and Accessories
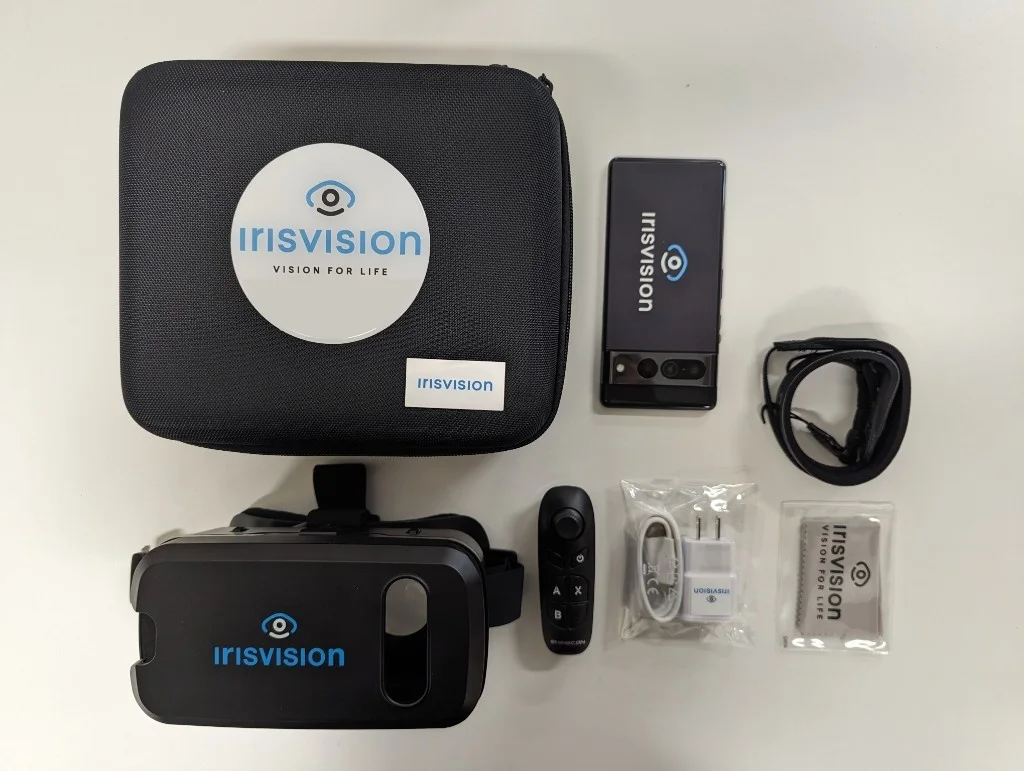
Your IrisVision device comes with the following items:
- IrisVision Display Unit
- Headset
- Remote Control
- Wired earphones
- Cleaning Cloth
- Carrying Case
- Lanyard
- Direct Charging Cable
Optional accessories (sold separately)
- Vision Cast — streams your TV, computer, or a streaming device into the headset
- Wireless earbuds — for listening without a cable
These are not in every case. Vision Cast setup is under Stream TV.
The Unboxing video on Getting Started shows each item and how to lift the phone out of the headset.
Removing the Display Unit
First-time setup (onboarding) is done on the phone, so take it out of the headset. The Getting Started videos show this step.
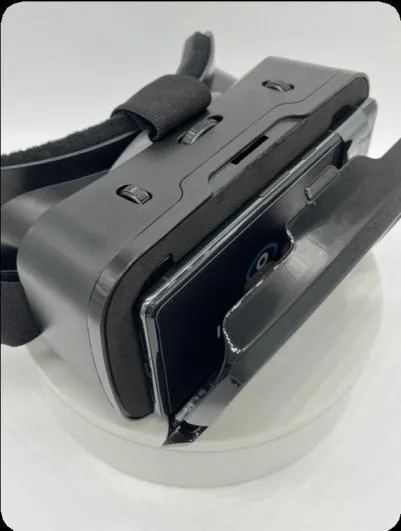
Release the IrisVision Display Unit from the headset by pushing the clip away from the Display Unit. Carefully remove the Display Unit and set aside the headset.
Powering On the Display Unit
Press the power button on the right side (or upper side when in the headset) until the phone vibrates. Iris then walks you through language, Wi-Fi, and the remote.
Setting Up Wi-Fi
Vista can connect to your Wi-Fi during onboarding, or later from Settings → Wi-Fi. A connection lets Customer Support assist you more efficiently, delivers software updates, and is required for YouTube, Movies, Books, and weather.
NOTE: Viewing modes work without Wi-Fi. A connection is still highly recommended.
Configuring Wi-Fi
- Go to Settings (stick left or right, or ask Iris to “open settings”).
- Choose Wi-Fi.
- Select the network you want and enter the password.
On the Wi-Fi keyboard, move the stick to highlight a key, press Action to type, and press Back to close the keyboard and return.
Positioning the Display Unit
After onboarding asks you to put the headset on:
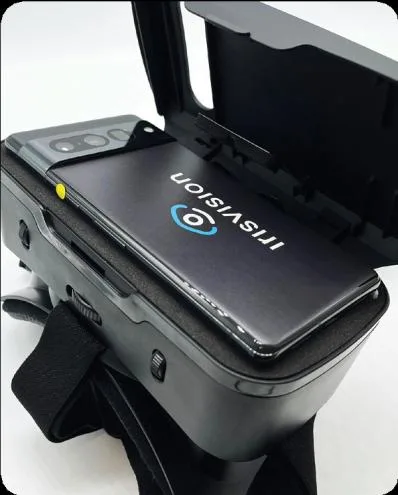
- Insert the Display Unit into the headset by centering it against the lenses as displayed. Ensure the camera aligns with the opening in the outside cover.
- Securely lock the Display Unit into the headset by pushing the outside cover up against the back.
- Put the headset on and tighten the side straps. The power button should face up.
The Getting Started video shows putting the phone back in.
Charging Instructions
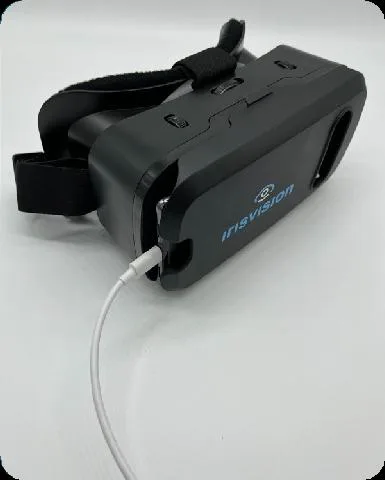
Charge Vista by plugging the USB-C cable into the port at the bottom of the phone, then into a wall charger. A full charge takes about two hours. The device charges fastest when it is completely powered off. We don’t recommend using Vista while it is plugged in. Charging and using at the same time can make the phone warm. Charge it on the charger, then put it back on when you’re ready. Ask Iris “battery” to hear the level.
Battery tips:
- Vista gives audible notifications when the battery drops to 20%, 15%, and 10%. At 8%, the device shuts off.
- Completely power off the phone if you will not use Vista for more than a few hours. Voice and the remote cannot shut the phone down — see Care and Maintenance.
- Auto Sleep is set in Settings → Headset. The default is 5 minutes. You can choose never, or 1, 2, 5, 10, 15, or 30 minutes. Playing media, Iris speaking, or an open microphone delays that timer.
Instructions for Using Vista
Preventive Measures
General Precautions
- Keep away from direct sunlight. It is especially important to keep the headset lenses away from any direct light source. These lenses are magnifiers and can cause damage to the screen of the display unit.
- Keep the IrisVision dry.
- Never walk while wearing the IrisVision headset.
- Never drive while wearing the IrisVision headset.
- Your IrisVision device will speak. You can lower the volume, or turn off audio entirely.
- Give your eyes a rest every hour or two. Take the headset off for a few minutes — longer if anything feels tired or uncomfortable.
Warnings
- Using the headset can result in short-term side effects which can include: nausea, motion sickness, disorientation, headaches, eye strains, and blurred vision. These typically subside after an initial adjustment period.
- If you experience any side effects, discontinue use and stay seated until symptoms stop. If symptoms persist, contact your doctor.
- Do not turn on accessibility options on the display unit, as this can interfere with the IrisVision software.
Using the Remote Control
Every time the phone is powered on, wakes from sleep, or the remote has timed out, turn the remote on again. Press and hold the remote power button for one second until the blue light appears. Wait until Vista says “Your remote is connected.”
NOTE: If the remote does not connect, replace the batteries and try again.
The remote turns itself off after 30 seconds of inactivity to save battery.
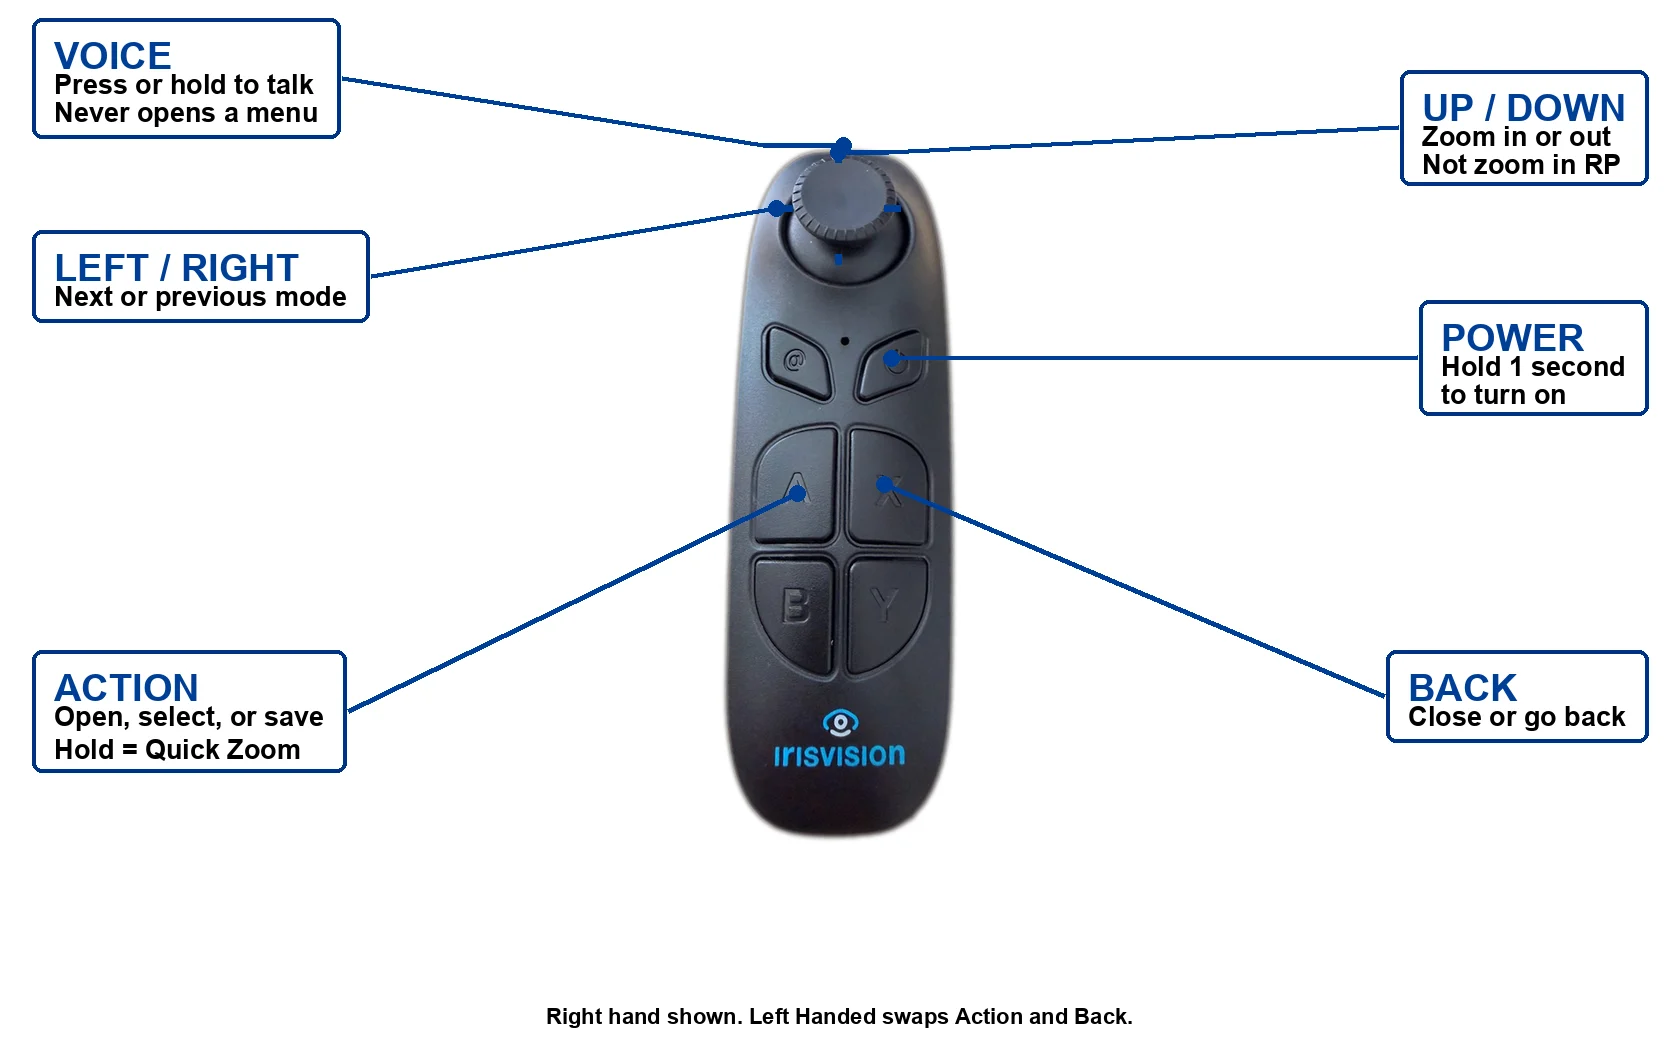
| Control | What it does |
|---|---|
| Stick left / right | Previous or next mode. In a menu, previous or next item. |
| Stick up / down | Zoom in or out in a camera mode (except RP — that changes viewport size). In a menu, adjust a highlighted setting. |
| Action | Open the menu, select an item, or save a setting — including the zoom you just set. Vista says “Setting saved.” |
| Action (hold) | Quick Zoom in a camera mode (or Photo Gallery, unless zoom is locked). In YouTube, Movies, Books, or a game, leave the player and return to the list. |
| Back | Close a menu, or discard an in-progress adjustment. |
| Voice | Open the microphone for Iris. This never opens a menu. |
| Power | Turn the remote on or off. |
If you use the remote in your left hand, turn on Left Handed under Settings → System. Action and Back swap so they still feel natural.
In a menu, move the stick to highlight an item, press Action to select it, and press Back to leave. For brightness, zoom, IPD, and similar values, preview with the stick, then press Action to save or Back to discard.
Zoom in a viewing mode
In any camera mode except RP, stick up zooms in and stick down zooms out on the live picture. Press Action if you want to store that zoom for the next time you return to the mode. Vista says “Setting saved.” Back keeps the previous zoom.
Hold Action for Quick Zoom (the level from Settings → Quick Zoom). You can also say “zoom in,” “zoom out,” or “quick zoom.”
In RP, stick up/down changes viewport size, not zoom. Save that size the same way — press Action. Zoom in RP is in the mode menu or by voice. See RP.
Direction for Use
Powering On
Power on the Display Unit by pressing the power button on the right side of the display unit. When the display unit is in the headset, this button will be on top.
Wearing the Headset
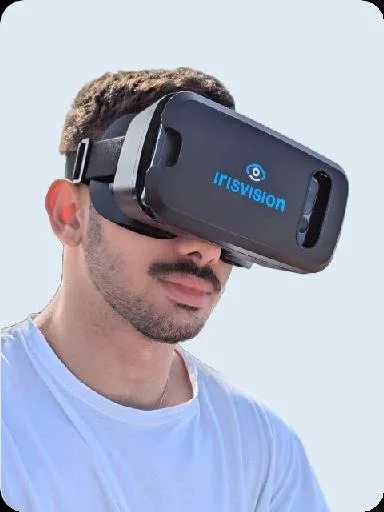
Place the headset on your head and adjust the side straps for a secure fit. The display unit should be centered over the lenses with the power button facing up. The camera should be centered in the cutout of the headset cover.
NOTE: Do not walk around while wearing the IrisVision headset.
Setting Up Focus
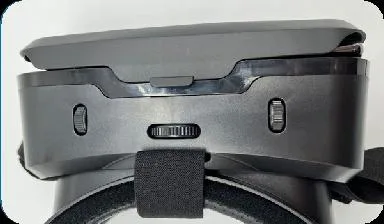
The IrisVision headset allows for individual lens focus. To adjust the focus, slowly turn the wheel above the intended lens.
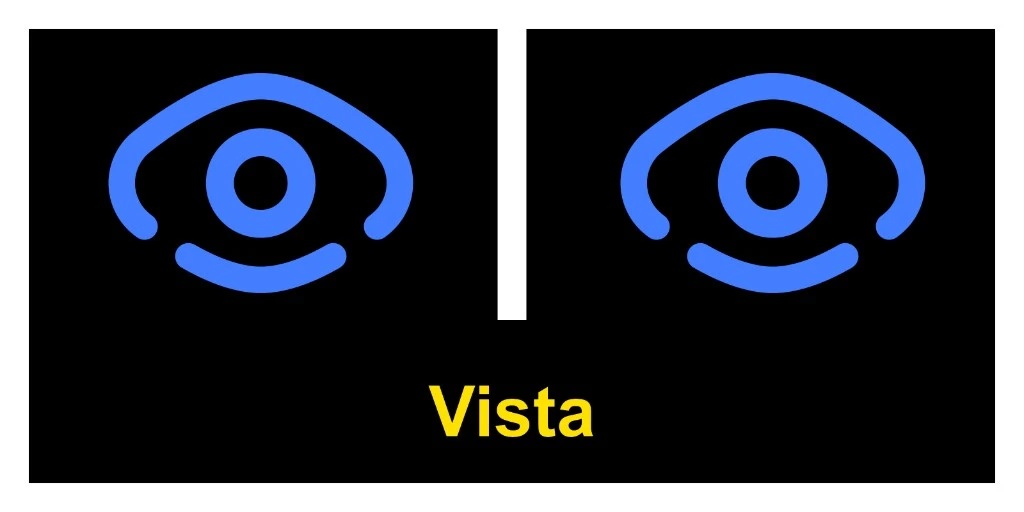
- After powering on, Vista should show Welcome (Focus) — a high-contrast image with a blue IrisVision eye in each lens and the word Vista. If you are not there, push the stick left or right, or ask Iris to “go to the welcome screen.”
- Adjust each focus wheel until the image looks as clear as possible in each lens.
- IPD is two steps — you need both. If you see a double or overlapping image, set interpupillary distance this way:
- On the headset: turn the IPD dial at the top center until the image feels centered. That dial rotates left and right; the lens focus wheels rotate front and back.
- In the app: open IPD from the Welcome menu or Settings → Headset → IPD. Press Action, move the stick up or down until the image looks clear, then press Action to save.
To focus one eye at a time, turn the other lens off from Welcome or Settings → Headset, then turn both back on.
Interacting with Iris
Iris is the voice assistant on Vista. Speak in everyday language — you do not need exact phrases. Ask for what you want (“make it bigger,” “read this to me,” “what is this mode for,” “sleep”) and Iris will do it or answer you. Speak in the language you chose in Settings.
Two ways to talk to Iris
- Voice button — press or hold Voice on the remote until the listening banner appears or the device chimes, then speak. This only opens the microphone. It never opens a menu.
- Say the wake word “Iris” — wait until Iris responds and the yellow microphone appears, then say the command. Do not say “Iris” and the command in one breath. Turn Iris Listen on in Settings → Iris.
If you change your mind while the microphone is open, say “stop” or “never mind.”
First commands to try
- “What is this mode for?” — Iris explains the mode you are in.
- “Sleep” — puts Vista to sleep. Say Iris to wake (Iris Listen must be on).
- “Go to reading” / “go to scene” / “open settings”
- “Zoom in” / “zoom out” / “quick zoom”
- “Read this” — then “play” or “pause.”
- “Take a picture”
- “What time is it?” / “what’s the weather?”
Common things you can say
- Switch modes: “welcome” or “focus,” “scene,” “bubble,” “bioptic,” “reading” (plus “reading dark,” “reading yellow,” “reading green,” and more), “outline,” “television,” “vision cast” or “stream TV,” “photo gallery,” “YouTube,” “movies,” “books,” “games,” “settings,” or “RP.”
- Magnify: “zoom in,” “zoom out,” “maximum zoom,” “reset zoom,” “quick zoom.”
- Adjust the image: “brightness,” “contrast,” “exposure,” “field of view,” and “sensitivity” — each also works with “increase,” “decrease,” “maximum,” “low,” or “reset” (for example, “increase brightness” or “reset contrast”).
- Read text aloud: “capture text” or “read this,” then “play” or “pause.”
- Reading line: “reading line on” or “reading line off.”
- Photos: “take a picture,” “photo gallery,” “next picture,” “previous picture,” “open picture,” “close picture,” “delete.”
- Audio: “volume,” “increase volume,” “decrease volume.”
- Lenses & focus: “turn off right lens,” “turn off left lens,” “turn on both lenses,” “IPD.”
- Device info: “battery,” “serial number,” “system info.”
- Sleep: “sleep.”
- Onboarding: “start onboarding” or “restart onboarding.”
- Everyday: “what time is it,” “what’s the weather.”
Iris cannot shut the phone down. Use sleep for a break. To power off completely, use the phone buttons in Care and Maintenance.
How Iris listens and talks is under Settings → Iris (master switch, Iris Listen, sensitivity, Iris Talk, voice speed). Language is Settings → Language.
Vista Modes
After adjusting focus, push the stick left or right to move through modes. Vista announces each one as you land on it. Ask “What is this mode for?” if you want Iris to explain the one you are in. You can also ask Iris to go directly to a mode.
Personalize each mode with its in-mode settings. When you are in a mode, press Action to open that mode’s personalization settings. Stick left/right to highlight a row. The How to change column matches the app: some rows change with stick up/down while highlighted; others open a live preview when you press Action — stick up/down, then Action to save or Back to discard. Press Back again to close the menu. Reset Mode clears only that mode — not the whole headset.
In camera modes except RP, stick up/down zooms on the live picture; press Action to save that zoom for later.
You can hide unused modes under Settings → Headset → Modes. Hidden modes stay available by voice.
| Mode | What it is for |
|---|---|
| Welcome | Home screen and focus chart |
| Scene | Look around at mid-to-far distance |
| Bubble | Circular magnifier over the live scene |
| Bioptic | Rectangular telescope window over the scene |
| Reading | Close-up text — books, mail, labels |
| Outline | High-contrast edges for shapes and objects |
| RP | Smaller field for tunnel vision |
| Television | Watching a TV or computer screen |
| Stream TV | Vision Cast — HDMI stream into the headset |
| Photo Gallery | Photos you took on Vista |
| YouTube | Search and watch videos (Wi-Fi) |
| Movies | Free full-length movies (Wi-Fi) |
| Books | Free audio books (Wi-Fi) |
| Games | Purpose-built games for the low vision community |
| Settings | Headset-wide options — see Settings |
Welcome Mode
Welcome is the first mode when you start up, and has a high-contrast image to help set your focal point. Use the focus wheels over each eye. Press Action to personalize Welcome. IPD is two steps: first the IPD dial on top of the headset, then IPD in this menu (or Settings → Headset). Once the image is clear, turn both lenses back on.
| Setting | What it does | How to change |
|---|---|---|
| Volume | Headset loudness. | Highlight the row. Stick up/down. |
| Brightness | How bright Welcome looks. This is also the headset default brightness. | Stick up/down while highlighted, or press Action to preview, then Action to save. |
| Field of View | Default magnification for modes that follow the headset FOV. | Press Action. Stick up/down to preview. Action saves. Back discards. |
| IPD | Second step of IPD. Stick up or down to align the two eye views, then Action to save. First step is the IPD dial on the headset. | Press Action. Stick up/down to preview. Action saves. Back discards. |
| Left lens / Right lens | Turn that eye off so you can focus the other, then turn both back on. | Press Action to turn on or off. |
Scene Mode
Scene is the default live view. It shows the colors and contrast of the scenery in front of you, with autofocus and zoom. Stick up/down zooms; press Action to save that zoom for next time. Press Action again (when you are not on the zoom bar) to personalize Scene.
| Setting | What it does | How to change |
|---|---|---|
| Take a Picture | Saves a photo to Photo Gallery. | Press Action. |
| Read text | Photographs the page and reads it aloud. Not available when the language is Arabic or Urdu. | Press Action. |
| Flashlight | Turns the phone torch on or off. | Press Action to turn on or off. |
| Brightness | How bright Scene looks. Applies only to Scene. | Press Action. Stick up/down to preview. Action saves. Back discards. |
| Contrast | How strong the difference is between light and dark in Scene. | Press Action. Stick up/down to preview. Action saves. Back discards. |
| Viewport Size | How large the stereo image appears in Scene. | Press Action. Stick up/down to preview. Action saves. Back discards. |
| Adjust View | Image shape: Max view, Soft edges, or Lens view. | Press Action. Stick up/down to preview shapes. Action saves. |
| Exposure | Camera lighting — brighter or darker for the room. | Press Action. Stick up/down to preview. Action saves. Back discards. |
| Zoom | Magnification in Scene. Stick up/down on the live picture also zooms; Action saves it. | Press Action. Stick up/down to preview. Action saves. Back discards. |
| Quick Zoom | How far Vista jumps when you hold Action. | Press Action to jump to your saved Quick Zoom now. |
| Reset Mode | Clears only Scene. Other modes stay as you left them. | Press Action. |
Bubble Mode
Bubble is like Scene with a circular magnifier in the center. Magnify one object while keeping the surrounding area visible — useful for signs, faces, or fine detail.
Press Action to personalize Bubble. You can also say “increase bubble size,” “decrease bubble size,” or “move bubble.”
Adjust Bubble is two steps — size, then placement. Choose Adjust Bubble. A yellow ring appears on the live picture.
- Size: stick up or down until the bubble is the size you want. Press Action to save that size.
- Placement: stick up or down (and left or right) to move the bubble. Press Action to save the place. Back cancels.
| Setting | What it does | How to change |
|---|---|---|
| Adjust Bubble | Two steps. First stick up/down to set size, then Action to save. Then stick up/down (or left/right) to place the bubble, then Action again to save. | Press Action, then size with stick up/down, Action to save size, then place with the stick, Action to save. |
| Flashlight | Turns the phone torch on or off. | Press Action to turn on or off. |
| Brightness | How bright Bubble looks. Applies only to Bubble. | Press Action. Stick up/down to preview. Action saves. Back discards. |
| Contrast | How strong the difference is between light and dark in Bubble. | Press Action. Stick up/down to preview. Action saves. Back discards. |
| Viewport Size | How large the stereo image appears in Bubble. | Press Action. Stick up/down to preview. Action saves. Back discards. |
| Adjust View | Image shape: Max view, Soft edges, or Lens view. | Press Action. Stick up/down to preview shapes. Action saves. |
| Exposure | Camera lighting — brighter or darker for the room. | Press Action. Stick up/down to preview. Action saves. Back discards. |
| Zoom | Magnification in Bubble. Stick up/down on the live picture also zooms; Action saves it. | Press Action. Stick up/down to preview. Action saves. Back discards. |
| Quick Zoom | How far Vista jumps when you hold Action. | Press Action to jump to your saved Quick Zoom now. |
| Reset Mode | Clears only Bubble, including bubble size and position. | Press Action. |
Bioptic Mode
Bioptic is a telescope magnifier: a small rectangular window that magnifies one spot while you keep the rest of the scene in view. Press Action to personalize Bioptic.
Adjust Box is two steps — size, then placement. Same pattern as Adjust Bubble. Choose Adjust Box. A yellow ring appears on the live picture.
- Size: stick up or down until the window is the size you want. Press Action to save that size.
- Placement: stick up or down (and left or right) to move the window. Press Action to save the place. Back cancels.
| Setting | What it does | How to change |
|---|---|---|
| Adjust Box | Two steps. First stick up/down to set size, then Action to save. Then stick up/down (or left/right) to place the window, then Action again to save. | Press Action, then size with stick up/down, Action to save size, then place with the stick, Action to save. |
| Flashlight | Turns the phone torch on or off. | Press Action to turn on or off. |
| Brightness | How bright Bioptic looks. Applies only to Bioptic. | Press Action. Stick up/down to preview. Action saves. Back discards. |
| Contrast | How strong the difference is between light and dark in Bioptic. | Press Action. Stick up/down to preview. Action saves. Back discards. |
| Viewport Size | How large the stereo image appears in Bioptic. | Press Action. Stick up/down to preview. Action saves. Back discards. |
| Adjust View | Image shape: Max view, Soft edges, or Lens view. | Press Action. Stick up/down to preview shapes. Action saves. |
| Exposure | Camera lighting — brighter or darker for the room. | Press Action. Stick up/down to preview. Action saves. Back discards. |
| Zoom | Magnification in Bioptic. Stick up/down on the live picture also zooms; Action saves it. | Press Action. Stick up/down to preview. Action saves. Back discards. |
| Quick Zoom | How far Vista jumps when you hold Action. | Press Action to jump to your saved Quick Zoom now. |
| Reset Mode | Clears only Bioptic, including box size and position. | Press Action. |
Reading Mode
Reading is designed for the highest contrast on a page. The default is Reading Light. Place text on a steady surface with clear overhead lighting. Stick up/down zooms; press Action to save that zoom. Press Action again to personalize Reading. That color stays the next time you return. You can also say “reading dark,” “reading yellow,” and so on from any mode.
| Setting | What it does | How to change |
|---|---|---|
| Read text | Photographs the page and reads it aloud (or say “read this”). Not available when the language is Arabic or Urdu. | Press Action. |
| Reading Line | Magnifies one or two lines in the center of the screen. Works with any reading color. | Press Action to turn on or off. |
| Line Size | How tall the reading line is. Appears only when Reading Line is on. | Press Action. Stick up/down to preview. Action saves. Back discards. |
| Reading Light | White background, black text (default). | Press Action to choose this. |
| Reading Dark | Black background, white text. | Press Action to choose this. |
| Reading Yellow | Yellow background, black text. | Press Action to choose this. |
| Reading Inverted | Black background, yellow text. | Press Action to choose this. |
| Reading Green | Green background, black text. | Press Action to choose this. |
| Flashlight | Turns the phone torch on or off. | Press Action to turn on or off. |
| Brightness | How bright Reading looks. Applies only to Reading. | Press Action. Stick up/down to preview. Action saves. Back discards. |
| Contrast | How strong the difference is between light and dark in Reading. | Press Action. Stick up/down to preview. Action saves. Back discards. |
| Viewport Size | How large the stereo image appears in Reading. | Press Action. Stick up/down to preview. Action saves. Back discards. |
| Adjust View | Image shape: Max view, Soft edges, or Lens view. | Press Action. Stick up/down to preview shapes. Action saves. |
| Exposure | Camera lighting — brighter or darker for the page. | Press Action. Stick up/down to preview. Action saves. Back discards. |
| Zoom | Magnification in Reading. Stick up/down on the live picture also zooms; Action saves it. | Press Action. Stick up/down to preview. Action saves. Back discards. |
| Quick Zoom | How far Vista jumps when you hold Action. | Press Action to jump to your saved Quick Zoom now. |
| Reset Mode | Clears only Reading and returns the color to Light. | Press Action. |
RP (Retinitis Pigmentosa) Mode
RP is for tunnel vision (retinitis pigmentosa and similar conditions). It keeps Scene’s colors, but shrinks the whole picture into a smaller window so more of the room fits inside the part of your vision that still works.
Press Action to personalize RP.
This mode does not use stick up/down for zoom. In other camera modes, stick up/down zooms in and out. In RP, stick up/down changes viewport size on the live picture:
- Stick up — enlarge the window (more of the scene, larger field).
- Stick down — shrink the window (less of the scene, smaller field).
- Action — save the size. Vista says “Setting saved.”
- Back — discard and keep the previous size.
Stick left/right still moves to the next or previous mode. Zoom is in the RP menu, or by voice (“zoom in,” “zoom out”).
| Setting | What it does | How to change |
|---|---|---|
| Viewport Size | How large the RP window is. First row in the menu. On the live picture, stick up enlarges the window; stick down shrinks it; Action saves. | Press Action. Stick up/down to preview. Action saves. Back discards. |
| Zoom | Magnification inside the RP window. Not on the live stick — only this row or voice. | Press Action. Stick up/down to preview. Action saves. Back discards. |
| Take a Picture | Saves a photo to Photo Gallery. | Press Action. |
| Read text | Photographs the page and reads it aloud. Not available when the language is Arabic or Urdu. | Press Action. |
| Flashlight | Turns the phone torch on or off. | Press Action to turn on or off. |
| Brightness | How bright RP looks. Applies only to RP. | Press Action. Stick up/down to preview. Action saves. Back discards. |
| Contrast | How strong the difference is between light and dark in RP. | Press Action. Stick up/down to preview. Action saves. Back discards. |
| Adjust View | Image shape: Max view, Soft edges, or Lens view. | Press Action. Stick up/down to preview shapes. Action saves. |
| Exposure | Camera lighting — brighter or darker for the room. | Press Action. Stick up/down to preview. Action saves. Back discards. |
| Quick Zoom | How far Vista jumps when you hold Action. | Press Action to jump to your saved Quick Zoom now. |
| Reset Mode | Clears only RP. | Press Action. |
Television Mode
Television is tuned for a TV or computer screen. Sit centered in front of the display. Stick up/down zooms; press Action to save that zoom. Press Action again to personalize Television. There is no flashlight in this mode (the torch washes out a screen). Auto Sleep is delayed while you watch. Use Settings → Sleep or say “sleep” when you are done.
| Setting | What it does | How to change |
|---|---|---|
| Take a Picture | Saves a photo to Photo Gallery. | Press Action. |
| Read text | Photographs on-screen text and reads it aloud. Not available when the language is Arabic or Urdu. | Press Action. |
| Brightness | How bright Television looks. Applies only to Television. | Press Action. Stick up/down to preview. Action saves. Back discards. |
| Contrast | How strong the difference is between light and dark in Television. | Press Action. Stick up/down to preview. Action saves. Back discards. |
| Viewport Size | How large the stereo image appears in Television. | Press Action. Stick up/down to preview. Action saves. Back discards. |
| Adjust View | Image shape: Max view, Soft edges, or Lens view. | Press Action. Stick up/down to preview shapes. Action saves. |
| Exposure | Camera lighting for the screen — there is no flashlight here. | Press Action. Stick up/down to preview. Action saves. Back discards. |
| Zoom | Magnification in Television. Stick up/down on the live picture also zooms; Action saves it. | Press Action. Stick up/down to preview. Action saves. Back discards. |
| Quick Zoom | How far Vista jumps when you hold Action. | Press Action to jump to your saved Quick Zoom now. |
| Reset Mode | Clears only Television. | Press Action. |
Outline Mode
Outline draws edges around objects so shapes stand out. The default is Outline Light. Press Action to personalize Outline. You can also change color by voice (“outline color”).
| Setting | What it does | How to change |
|---|---|---|
| Outline Size | Makes the edge lines thinner or thicker. | Press Action. Stick up/down to preview. Action saves. Back discards. |
| Sensitivity | How much outline detail appears. | Press Action. Stick up/down to preview. Action saves. Back discards. |
| Outline Light | White background, black outlines (default). | Press Action to choose this. |
| Outline Dark | Black background, white outlines. | Press Action to choose this. |
| Outline Color | Colorful background, black outlines. | Press Action to choose this. |
| Flashlight | Turns the phone torch on or off. | Press Action to turn on or off. |
| Brightness | How bright Outline looks. Applies only to Outline. | Press Action. Stick up/down to preview. Action saves. Back discards. |
| Contrast | How strong the difference is between light and dark in Outline. | Press Action. Stick up/down to preview. Action saves. Back discards. |
| Viewport Size | How large the stereo image appears in Outline. | Press Action. Stick up/down to preview. Action saves. Back discards. |
| Adjust View | Image shape: Max view, Soft edges, or Lens view. | Press Action. Stick up/down to preview shapes. Action saves. |
| Exposure | Camera lighting — brighter or darker for the room. | Press Action. Stick up/down to preview. Action saves. Back discards. |
| Zoom | Magnification in Outline. Stick up/down on the live picture also zooms; Action saves it. | Press Action. Stick up/down to preview. Action saves. Back discards. |
| Quick Zoom | How far Vista jumps when you hold Action. | Press Action to jump to your saved Quick Zoom now. |
| Reset Mode | Clears only Outline and returns the color to Light. | Press Action. |
Stream TV (Vision Cast)
Stream TV casts HDMI video into the headset from your TV, computer, or a streaming device (such as an Amazon Fire Stick). You need the Vision Cast HDMI transmitter — it is sold separately and may not be in your case.
Press Action in Stream TV to personalize the mode, or choose Connect to pair the transmitter.
Setting up Vision Cast
TV cable box or computer
Use the HDMI cable that came with the transmitter. Plug one end into HDMI IN on the transmitter, and the other into the HDMI output on your cable box or computer.
Streaming stick (Amazon Fire Stick or similar)
Plug the stick into HDMI IN on the transmitter. Open Stream TV in the headset. When the transmitter is connected, the stick’s setup screens appear in Vista — Wi-Fi, sign-in, and the rest — so you finish setup from inside the headset.
Then press Action and choose Connect.
| Setting | What it does | How to change |
|---|---|---|
| Connect | Starts pairing with the Vision Cast transmitter. | Press Action. |
| Delete | Removes a saved transmitter. | Press Action. |
| Volume | Headset loudness while you watch. | Highlight the row and stick up/down, or stick up/down while playing. |
| Brightness | How bright Stream TV looks. Applies only to Stream TV. | Press Action. Stick up/down to preview. Action saves. Back discards. |
| Contrast | How strong the difference is between light and dark in Stream TV. | Press Action. Stick up/down to preview. Action saves. Back discards. |
| Zoom | Magnification of the HDMI picture. | Press Action. Stick up/down to preview. Action saves. Back discards. |
| Reset Mode | Clears only Stream TV. | Press Action. |
Photo Gallery
Photo Gallery shows pictures you have taken in camera modes such as Scene, Television, and Reading. You can zoom in close and pan so a detail fills the view. On the tile, press Action to open the gallery. Open the menu to personalize the gallery.
| Setting | What it does | How to change |
|---|---|---|
| Delete | Removes the highlighted photo (or say “delete”). | Press Action, then Yes or No. |
| Brightness | How bright photos look. Applies only to Photo Gallery. | Press Action. Stick up/down to preview. Action saves. Back discards. |
| Contrast | How strong the difference is between light and dark in Photo Gallery. | Press Action. Stick up/down to preview. Action saves. Back discards. |
| Zoom | Magnification when you open a photo. | Press Action. Stick up/down to preview. Action saves. Back discards. |
| Reset Mode | Clears only Photo Gallery. | Press Action. |
On the Photo Gallery tile
- Stick left/right — previous or next mode.
- Action — open the gallery. If you rest on the tile for about three seconds, the gallery opens on its own.
In the photo grid
- Stick left/right — next or previous photo.
- Stick up/down — move by row.
- Action — open the highlighted photo full screen.
- Back — return to the Photo Gallery tile.
Looking at one photo
- Stick up/down — zoom in or out (no zoom numbers on screen).
- Stick left/right — next or previous photo.
- Hold Action — Quick Zoom, unless zoom is already locked.
- When you have zoomed in, press Action to lock zoom. Vista says “zoom locked.” The stick then pans in all four directions so you can inspect a detail.
- Back unwinds one step at a time: unlock pan → unzoom → close the photo → leave the gallery.
Delete a photo from the menu, or say “delete.”
Read text
Read text photographs a page and reads it aloud.
Start in Scene, Reading, Television, or RP. Hold the page in front of the camera with good light. Open the menu and choose Read text, or say “read this” / “capture text.” A countdown from three gives you time to hold still. Vista then reads the captured text.
Play or pause from the menu or by voice (“play,” “pause”). If you change modes during a readout, or pause for 15 minutes, you must start again. Read text is not offered when the language is Arabic or Urdu.
Getting Started covers this in Week 2.
YouTube, Movies, Books, and Games each have three places: the mode tile, the list, and inside a title. On the tile, stick left/right still changes modes. Press Action to open the list right away, or wait about three seconds and Vista opens it for you.
YouTube
YouTube shows a feed of IrisVision videos first. It needs Wi-Fi. On the tile, press Action to open the list. While a video is playing, press Action to play or pause, or open the menu to personalize the player.
| Setting | What it does | How to change |
|---|---|---|
| Play / Pause | Starts or pauses the video. | Press Action. |
| Video Search | Find a video by voice — say “search” plus what you want. Say “clear search” to return to the featured list. | Press Action, then say what to search. |
| Volume | How loud the video is. Stick up/down on the player also changes volume. | Highlight the row and stick up/down, or stick up/down while playing. |
| Brightness | How bright the player looks. Applies only to YouTube. | Press Action. Stick up/down to preview. Action saves. Back discards. |
| Contrast | How strong the difference is between light and dark in YouTube. | Press Action. Stick up/down to preview. Action saves. Back discards. |
| Zoom | Magnification of the video. | Press Action. Stick up/down to preview. Action saves. Back discards. |
| Reset Mode | Clears only YouTube. | Press Action. |
On the YouTube tile
- Stick left/right — previous or next mode.
- Action — open the video list (or wait a few seconds).
In the video list
- Stick — previous or next title.
- Action — play the highlighted video.
- Back — return to the YouTube tile.
- Press Voice and say “search” plus what you want — for example “search Italian recipes.” You can also open Video Search from the video menu. Say “clear search” to return to the featured list.
While a video is playing
- Stick left/right — scrub. Move twice quickly to jump farther.
- Stick up/down — volume.
- Action — play or pause.
- Back or hold Action — leave the player and return to the list.
Movies
Movies searches and plays free full-length films in the headset. It needs Wi-Fi. The controls match YouTube. Press Action on the tile to open the list. While a film is playing, open the menu to personalize the player.
| Setting | What it does | How to change |
|---|---|---|
| Play / Pause | Starts or pauses the film. | Press Action. |
| Search | Find a film by voice — say “search” plus the title. Say “clear search” to return to the featured list. | Press Action, then say what to search. |
| Volume | How loud the film is. Stick up/down on the player also changes volume. | Highlight the row and stick up/down, or stick up/down while playing. |
| Brightness | How bright the player looks. Applies only to Movies. | Press Action. Stick up/down to preview. Action saves. Back discards. |
| Contrast | How strong the difference is between light and dark in Movies. | Press Action. Stick up/down to preview. Action saves. Back discards. |
| Zoom | Magnification of the film. | Press Action. Stick up/down to preview. Action saves. Back discards. |
| Reset Mode | Clears only Movies. | Press Action. |
On the Movies tile
- Stick left/right — previous or next mode.
- Action — open the film list (or wait a few seconds).
In the film list
- Stick — previous or next title.
- Action — play the highlighted film.
- Back — return to the Movies tile.
- Say “search” plus the film you want. Say “clear search” to return to the featured list.
While a film is playing
- Stick left/right — scrub (twice quickly to jump).
- Stick up/down — volume.
- Action — play or pause.
- Back or hold Action — return to the list.
Books
Books plays free audio books in the headset. It needs Wi-Fi. The list and player work the same way as Movies. Press Action on the tile to open the list. While a book is playing, open the menu to personalize playback.
| Setting | What it does | How to change |
|---|---|---|
| Play / Pause | Starts or pauses the book. | Press Action. |
| Search | Find a book by voice — say “search” plus the title. Say “clear search” to return to the featured list. | Press Action, then say what to search. |
| Volume | How loud the book is. Stick up/down on the player also changes volume. | Highlight the row and stick up/down, or stick up/down while playing. |
| Reset Mode | Clears only Books. | Press Action. |
On the Books tile
- Stick left/right — previous or next mode.
- Action — open the book list (or wait a few seconds).
In the book list
- Stick — previous or next title.
- Action — play the highlighted book.
- Back — return to the Books tile.
- Say “search” plus the book you want. Say “clear search” to return to the featured list.
While a book is playing
- Stick left/right — scrub (twice quickly to jump).
- Stick up/down — volume.
- Action — play or pause.
- Back or hold Action — return to the list.
Games
These games are purpose-built for the low vision community. Installed games work without Wi-Fi; the list updates when you are online. Press Action on the tile to open the list. Inside a game, the stick and Action belong to that game — they do not open personalization settings. Leave with Back or hold Action.
On the Games tile
- Stick left/right — previous or next mode (Books on one side, Settings on the other).
- Action — open the game list (or wait a few seconds).
In the game list
- Stick — highlight a title. Vista reads a short description.
- Action — start the highlighted game.
- Back — return to the Games tile.
- You can also say “open games” or “play” plus the game name.
Inside a game
- The stick and Action belong to that game (they do not change modes).
- Back or hold Action — leave the game and return to the list.
Settings is the headset-wide menu — not a viewing mode. The full list is in the next section.
Settings
Open Settings with the stick or by saying “open settings.” These are headset-wide (global) settings. Stick left/right to highlight a row. The How to change column matches the app — what happens when you press Action, and how you adjust the value. Press Back or Main Menu to return.
Main Settings
| Item | What it does | How to change |
|---|---|---|
| Sleep | Puts Vista to sleep. Say Iris to wake (Iris Listen must be on). | Press Action. Vista goes to sleep. |
| Quick Zoom | Sets the zoom level used when you hold Action in a camera mode. | Highlight the row. Stick up/down to set the hold-Action zoom. |
| Volume | Headset loudness. | Highlight the row. Stick up/down. |
| Brightness | Display brightness for the headset. In a viewing mode, brightness in that mode’s menu applies only to that mode. | Stick up/down while highlighted, or press Action to preview, then Action to save. |
| Iris | Voice assistant settings. | Press Action to open the Iris menu. |
| Headset | Fit, view, Auto Sleep, Modes, lenses, Reset Headset. | Press Action to open the Headset menu. |
| System | Serial number, system info, Left Handed. | Press Action to open the System menu. |
| Wi-Fi | Connect to a different network. | Press Action. Stick to a network. Action to select. |
| Language | Language for menus, Iris, and on-screen text. | Press Action. Stick to a language. Action to choose. |
| Onboarding | Replay first-time setup. | Press Action to replay first-time setup. |
Iris (this submenu is only available while Iris is on)
| Item | What it does | How to change |
|---|---|---|
| Iris | Master switch. Off: Iris will not listen or speak until you turn her back on here with the remote (not by voice). | Press Action to turn Iris on or off. Confirm if turning off. |
| Iris Listen | Hear the name “Iris” and start a command without the Voice button. If this is off, you can still press Voice. | Press Action to turn on or off. |
| Iris Sensitivity | How easily she wakes on her name (1–10). Raise it if she misses you; lower it if she wakes on other speech. | Highlight the row. Stick up/down. |
| Iris Talk | Spoken prompts and confirmations. Commands still run when Talk is off. | Press Action to turn on or off. |
| Voice speed | How fast Iris speaks. | Highlight the row. Stick up/down. |
Headset
| Item | What it does | How to change |
|---|---|---|
| IPD | Second step of IPD (after the headset dial). Aligns the left and right eye views. Stick up or down, then Action to save. | Press Action. Stick up/down to preview. Action saves. Back discards. |
| Viewport Size | How large the stereo image appears. | Press Action. Stick up/down to preview. Action saves. Back discards. |
| Field of View | Default magnification for modes that follow the headset FOV. | Press Action. Stick up/down to preview. Action saves. Back discards. |
| Adjust View | Image shape: Max view, Soft edges, or Lens view. | Press Action. Stick to Max view, Soft edges, or Lens view. Action to choose. |
| Auto Sleep | How long before Vista sleeps itself: never, or 1, 2, 5, 10, 15, or 30 minutes (default 5). | Highlight the row. Stick up/down. |
| Modes | Show or hide Bubble, Bioptic, Outline, RP, Television, Stream TV, Movies, Books, and Games in the carousel. Welcome, Scene, Reading, Photo Gallery, YouTube, and Settings stay visible. Hidden modes stay available by voice. | Press Action. Stick to a mode. Action to hide or show it. |
| Left / right lens | Turn one eye display off to focus the other, then turn both back on. | Press Action to turn on or off. |
| Reset Headset | Restore most headset settings to defaults. Language, Wi-Fi, and your setup fit (IPD / FOV / viewport) are kept. Confirm Yes or No. This does not re-run onboarding. | Press Action, then Yes or No. |
Reset Mode (inside a mode menu) clears only that mode.
System
| Item | What it does | How to change |
|---|---|---|
| Serial Number | Reads the device serial aloud. | Press Action. Vista reads the serial aloud. |
| System Info | Battery, time, Wi-Fi, and related status. | Press Action. Vista speaks battery, time, and Wi-Fi. |
| Left Handed | Swaps Action and Back on the remote. | Press Action to turn on or off. |
Care and Maintenance
Cleaning Tips
- Wipe the outer parts of the headset with a dry, soft cloth or wipe.
- Remove the phone from the headset and wipe it down with a dry, soft cloth or wipe. Dust particles and smudges can collect on the screen or camera lens.
- Wipe down the lens bubbles on the inside and outside of the headset to remove dust particles and smudges.
- The foam lining of the headset that presses up against your face and the straps that go around your head can be removed for cleaning. Run them under warm water, use a mild soap to scrub, and then rinse and air dry them.
- If you use a lens cleaner, we recommend that you spray it on the cloth first, and then wipe down the headset.
How to Sleep or Shut Down Your Headset
Voice and the remote can put Vista to sleep. They cannot power the phone off.
Sleep
- Ask Iris “sleep,” or go to Settings → Sleep.
- The display goes dark.
- Say Iris to wake (Iris Listen must be on). Turn the remote on again if it has timed out.
Shut down (Pixel 7 Pro hardware)
Open the front cover so you can reach the buttons on the side of the phone.
- Press and hold the power button and volume up together for a few seconds.
- When the power menu appears, choose Power off.
- The screen turns black. You can then put the headset away.
To turn Vista back on, press and hold the power button until the phone vibrates. It takes about 20 seconds to reach Welcome. Turn the remote on again.
Coaching
We no longer book a set training hour. Learning Vista now starts on the headset: Iris walks you through first-time setup (onboarding). You can run that again anytime from Settings → Onboarding.
A coach also reaches out after your Vista arrives to answer questions — not to run a fixed lesson. They will check in from time to time to see how you are getting on. There is no preset appointment and no required session length.
If you want help between those check-ins, contact us.
Troubleshooting
If your Vista isn’t behaving as expected — it won’t power on, voice commands aren’t responding, or it needs a refresh — see Troubleshooting for step-by-step fixes, or contact our support team.
Contact
Need help? Our team is here for you.